Hardie Board Replacement A Complete Guide
Hardie board replacement might sound daunting, but understanding the process can make it manageable. This guide walks you through assessing your siding, choosing the right approach (repair or replacement), and even finding a reliable contractor. We’ll cover everything from identifying damage to budgeting and ensuring a long-lasting, beautiful finish. Get ready to tackle your Hardie board project with confidence!
Whether your Hardie board is suffering from minor damage or requires complete replacement, this guide provides a step-by-step process to help you navigate the project. We’ll cover everything from understanding the causes of Hardie board failure to choosing the right contractor and maintaining your new siding for years to come. We’ll also look at cost considerations and ways to save money while ensuring a high-quality outcome.
Understanding Hardie Board Failure
Hardie board, while a durable siding option, isn’t impervious to damage. Understanding the factors that contribute to its deterioration is crucial for homeowners and contractors alike, allowing for better maintenance and more accurate cost estimations for replacement projects. This section will explore the common causes of Hardie board failure, its lifespan under varying conditions, and the cost implications of replacement.
Common Causes of Hardie Board Damage
Several factors contribute to the degradation of Hardie board siding. Moisture is a primary culprit, leading to issues like swelling, cracking, and the growth of mold and mildew. Improper installation, such as inadequate sealing or fastening, can exacerbate these problems, allowing water to penetrate behind the siding. Exposure to extreme temperature fluctuations can also cause cracking and warping, particularly in regions with significant seasonal changes. Physical impact, from things like hail or flying debris, can cause dents and chips, compromising the siding’s integrity. Finally, the lack of proper maintenance, such as neglecting to clean and paint the siding regularly, can accelerate deterioration.
Hardie Board Lifespan and Climatic Conditions
The lifespan of Hardie board siding varies considerably depending on the climate. In mild, dry climates with minimal temperature fluctuations, Hardie board can last for 30 years or more with proper maintenance. However, in harsh environments with frequent freeze-thaw cycles, heavy rainfall, or intense sun exposure, the lifespan can be significantly shorter, potentially dropping to 15-20 years. Coastal regions, with their high salinity and humidity, can also accelerate degradation. For example, a home in Arizona’s desert might see a longer lifespan than a home in Florida’s humid coastal environment.
Comparison of Hardie Board Products and Susceptibility to Damage
Hardie offers various siding products, each with different properties and levels of resistance to damage. While all are fiber cement, formulations vary. Some are designed for greater impact resistance, while others offer improved moisture protection. Generally, thicker boards are more resistant to damage than thinner ones. The specific product chosen will impact its longevity and susceptibility to the factors mentioned above. For instance, HardiePlank lap siding, a popular choice, generally offers good durability, but its performance can still be affected by harsh weather conditions and poor installation.
Factors Influencing the Cost of Hardie Board Replacement
The cost of replacing Hardie board siding depends on several factors. The size of the area needing replacement is a major driver. Labor costs, which vary regionally and depending on the contractor’s experience, also significantly impact the overall expense. The chosen Hardie board product, with its varying price points, will also influence the final cost. The complexity of the project, such as the need for extensive repairs or the removal of existing siding, can add to the expense. Finally, the cost of materials like nails, sealant, and paint should be factored into the total budget. A small project might cost a few thousand dollars, while a large, complex job could easily reach tens of thousands.
Assessing the Need for Replacement
Deciding whether to repair or replace your Hardie board siding requires a careful assessment of its condition. Ignoring minor issues can lead to more extensive and costly damage down the line, while unnecessarily replacing perfectly good siding wastes resources and money. This section will guide you through the process of evaluating your siding and making an informed decision.
A thorough inspection is key to determining the best course of action. This involves more than just a quick glance; it requires a detailed examination of the entire surface area of your home’s siding. Consider both the aesthetic and structural integrity of the material.
Hardie Board Siding Condition Checklist
This checklist will help you systematically assess the condition of your Hardie board siding. Remember to thoroughly inspect all sides of your house, paying particular attention to areas prone to moisture damage like ground level and corners.
- Moisture Damage: Check for signs of water staining, swelling, or rotting. Look closely for discoloration or areas where the paint is peeling or bubbling.
- Physical Damage: Inspect for cracks, chips, dents, or holes in the siding. Note the size and severity of any damage. Consider the impact of any damage on the structural integrity of the wall underneath.
- Loose or Missing Pieces: Check for any loose or missing pieces of siding. Note if the fasteners are loose or damaged, contributing to the detachment. Pay close attention to areas near windows and doors.
- Pest Infestation: Examine the siding for signs of termite or other insect damage. Look for small holes, tunnels, or frass (insect droppings).
- Paint Condition: Assess the overall condition of the paint. Is it peeling, cracking, fading, or otherwise damaged? This can indicate underlying problems.
Decision-Making Flowchart for Repair vs. Replacement
This flowchart provides a visual guide to help you decide whether repair or replacement is the best option for your Hardie board siding.
Start: Inspect Hardie board siding using the checklist above.
Is the damage minor (small cracks, minor paint damage, a few loose pieces)?
Yes: Proceed to repair. Consider the extent of the damage and if you can handle it yourself or need a professional. If you are unsure, consult a professional.
No: Proceed to consider replacement.
Is the damage extensive (significant moisture damage, widespread cracking, large areas of missing siding, or pest infestation)?
Yes: Complete replacement is likely necessary. Consult a professional for an accurate assessment and quote.
No: Evaluate the cost-effectiveness of repair versus replacement. Consider the long-term implications and potential for future damage.
End: Make an informed decision based on the assessment and consult with a professional if needed.
Examples of Repair vs. Replacement Scenarios
Here are some real-world examples to illustrate when repair is sufficient and when complete replacement is necessary.
- Repair Sufficient: A small crack in a single piece of siding, easily repaired with caulk and paint. A few loose nails that can be easily re-secured.
- Replacement Necessary: Extensive water damage affecting multiple panels, requiring removal and replacement of multiple sections of siding. Significant insect infestation requiring complete removal and replacement to prevent further damage. Extensive cracking and warping across large areas of siding.
Importance of Professional Inspection Before Replacement
Before undertaking a Hardie board siding replacement, a professional inspection is crucial. A qualified contractor can accurately assess the extent of the damage, identify any underlying issues, and recommend the best course of action. They can also provide an accurate estimate of the costs involved, ensuring you’re not faced with unexpected expenses during the project. This is especially important for insurance claims or identifying any structural issues that might require further attention beyond siding replacement.
The Replacement Process

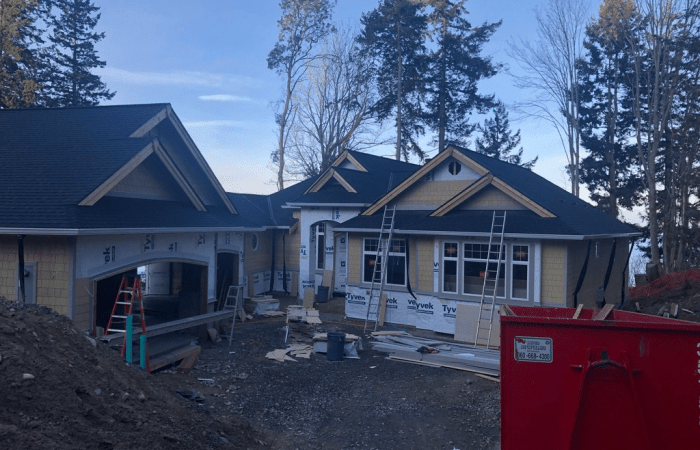
Source: kvconstruction.net
Replacing Hardie board siding is a multi-step process that requires careful planning and execution. Proper preparation and technique will ensure a long-lasting, attractive finish. This section details the steps involved in removing the old siding and installing the new, including necessary tools and techniques.
Removing Old Hardie Board Siding
Removing existing Hardie board involves careful work to avoid damage to the underlying structure. Start by disconnecting any electrical wiring or plumbing fixtures that might be attached to the siding. Then, begin removing the siding panels, starting from the top and working your way down. Use a pry bar to carefully loosen the panels from their fasteners, being mindful of not damaging the underlying sheathing. Dispose of the old siding responsibly, following local regulations for construction waste. Inspect the underlying sheathing for any damage and repair as needed before proceeding to the installation of the new siding.
Installing New Hardie Board Siding
Installing new Hardie board siding is a relatively straightforward process when approached methodically. Begin by ensuring the underlying structure is properly prepared – clean, dry, and free from any damage. Then, install the first panel, making sure it’s level and aligned with the building’s structure. Use appropriate fasteners and spacing, following manufacturer recommendations. Continue installing panels, overlapping them according to the manufacturer’s specifications. Pay close attention to corners and other details, using trim pieces where necessary to achieve a clean, professional finish. Always allow for proper expansion and contraction of the material, especially in areas with significant temperature fluctuations.
Necessary Tools and Materials
Before starting the project, gather all the necessary tools and materials. This will help streamline the process and avoid delays.
- Measuring tape
- Circular saw with a fine-tooth blade designed for Hardie board (or a scoring tool followed by snapping)
- Pry bar
- Hammer
- Drill with appropriate drill bits
- Safety glasses
- Work gloves
- Caulk gun
- Level
- New Hardie board panels
- Fasteners (nails or screws) appropriate for Hardie board
- Caulk
- Primer and paint (if needed)
- J-channel, corner trim, and other necessary trim pieces
Having all these items readily available will help ensure a smooth and efficient installation.
Cutting and Fitting Hardie Board Panels
Cutting Hardie board requires the right tools and techniques to prevent chipping and ensure clean cuts. Always use a fine-tooth blade designed for Hardie board to minimize chipping and ensure a smooth cut. For straight cuts, a circular saw is ideal. For more intricate cuts, a jigsaw might be necessary. Remember to always wear appropriate safety gear, including safety glasses and a dust mask. Pre-drilling pilot holes before fastening will help prevent cracking and ensure proper installation. When fitting panels, pay close attention to achieving a tight and seamless fit, using caulk to seal any gaps. Careful measurement and precise cuts are crucial for a professional-looking finish. Remember to account for expansion and contraction gaps as recommended by the manufacturer.
Cost and Budgeting
Replacing Hardie board siding is a significant investment, and understanding the associated costs is crucial for planning and budgeting. The total cost depends on several factors, including the size of your home, the extent of damage, the complexity of the job, your location, and whether you hire a contractor or tackle the project yourself. Let’s break down the various cost components to help you create a realistic budget.
Pricing Structures for Hardie Board Replacement
Different contractors may use various pricing structures. Some might charge by the square foot, others might offer a fixed price for the entire project, and some may use a combination of both. A price per square foot typically ranges from $5 to $15, but this can vary significantly based on factors like the complexity of the installation (e.g., intricate trim work, multiple stories) and the regional cost of labor and materials. A fixed-price contract offers more certainty, but requires a thorough assessment of the project scope upfront. Negotiating with multiple contractors and comparing their bids is vital to finding the best value.
Sample Budget for Hardie Board Replacement
This sample budget is for a medium-sized home (approximately 1500 square feet of siding) requiring complete replacement. Remember, this is an estimate, and your actual costs may vary.
| Cost Item | Estimated Cost |
|---|---|
| Materials (Hardie board, nails, flashing, etc.) | $6,000 – $10,000 |
| Labor (including removal, installation, and cleanup) | $5,000 – $10,000 |
| Permits | $200 – $500 |
| Contingency (for unforeseen expenses) | $1,000 – $2,000 |
| Total Estimated Cost | $12,200 – $22,500 |
Cost-Effective Solutions for Hardie Board Replacement
Several strategies can help reduce the overall cost. Opting for a less expensive grade of Hardie board might save money, but it’s essential to balance cost savings with long-term durability. Planning the project during the off-season (typically fall or winter) might lead to lower labor costs, as contractor demand is often lower. DIY projects can significantly reduce labor costs, but require considerable skill and time commitment. Thorough preparation and accurate material estimation minimize waste and unnecessary expenses. Finally, securing multiple bids and negotiating with contractors can help secure the most competitive pricing.
Contractor vs. DIY Hardie Board Replacement
Hiring a contractor offers peace of mind, professional expertise, and often a warranty on the work. However, it comes at a higher cost. DIY projects significantly lower labor costs, but require considerable time, skill, and access to appropriate tools and equipment. Improper installation can void warranties and lead to future problems, potentially costing more in the long run. Consider your skill level, available time, and the potential risks before deciding whether to DIY or hire a contractor. For complex projects or those involving significant heights, hiring a professional is strongly recommended.
Choosing the Right Contractor
Finding the right contractor for your Hardie board replacement is crucial for a successful and long-lasting outcome. A poorly chosen contractor can lead to shoddy workmanship, cost overruns, and ongoing problems. Taking the time to carefully vet potential contractors will save you headaches and money in the long run.
Questions to Ask Potential Contractors
Before committing to a contractor, it’s essential to gather comprehensive information. Thorough questioning will reveal their expertise, experience, and commitment to quality. This will help you make an informed decision.
- Years of experience in Hardie board installation and replacement.
- Licensing and insurance details, including worker’s compensation coverage.
- References from previous clients, with contact information readily available.
- Detailed breakdown of the project costs, including materials and labor.
- Warranty information on both workmanship and materials used.
- Their process for handling unexpected issues or delays during the project.
- Their approach to waste disposal and cleanup after the project is completed.
Contractor Qualifications and Experience Comparison
This table provides a framework for comparing potential contractors. Remember to fill in the information based on your own research and interviews.
| Contractor Name | Years of Experience | Licensing & Insurance | References |
|---|---|---|---|
| Contractor A | 15+ years | Licensed and Insured | 3+ positive reviews |
| Contractor B | 5 years | Licensed, Insured, Worker’s Comp | 1 positive review, 1 negative review |
| Contractor C | 10 years | Licensed and Insured | 2 positive reviews |
| Contractor D | 20+ years | Licensed and Insured, A+ rating with BBB | 5+ positive reviews |
The Importance of Multiple Bids and Comparisons
Obtaining multiple bids is vital for ensuring you receive a competitive price and understand the range of services offered. Comparing bids allows you to assess value for money and identify any discrepancies in pricing or scope of work. For example, one contractor might quote a lower price but use inferior materials, resulting in higher long-term costs.
Red Flags When Selecting a Contractor
Be wary of contractors who:
- Pressure you into making a quick decision without providing sufficient information.
- Are unwilling to provide references or proof of insurance and licensing.
- Give vague or unclear answers to your questions.
- Have a history of complaints or negative reviews online.
- Offer significantly lower prices than other reputable contractors without a clear explanation.
- Lack a detailed contract outlining the scope of work, payment schedule, and warranty.
Maintenance and Prevention

Source: advanceroofingllc.com
Proper maintenance is key to extending the life of your Hardie board siding. Regular care prevents minor issues from becoming major, costly repairs, saving you time and money in the long run. Think of it as preventative medicine for your home’s exterior.
Regular maintenance practices significantly impact the longevity of Hardie board. Neglecting these practices can lead to premature deterioration and necessitate expensive replacements. A proactive approach ensures your investment remains protected and aesthetically pleasing for years to come.
Regular Cleaning
Regular cleaning removes dirt, grime, and mildew that can gradually damage the surface of the Hardie board. A simple solution of mild detergent and water, applied with a soft brush or sponge, is usually sufficient. For tougher stains, a pressure washer can be effective, but use caution to avoid damaging the siding. Remember to rinse thoroughly and allow the siding to dry completely. Annual cleaning is recommended, but more frequent cleaning might be necessary in areas with heavy pollution or harsh weather conditions. For example, coastal areas often require more frequent cleaning due to salt spray.
Sealing Techniques
While Hardie board is naturally resistant to moisture, applying a high-quality sealant can further enhance its protection against water damage and the growth of mold and mildew. This is particularly important in areas prone to heavy rainfall or humidity. The sealant should be specifically designed for use with fiber cement siding and applied according to the manufacturer’s instructions. Proper application involves ensuring even coverage, avoiding excessive build-up, and allowing sufficient drying time. Regular inspection for areas where the sealant has worn off or chipped is crucial. Re-sealing these areas promptly prevents moisture penetration. For instance, areas around windows and doors often require more frequent attention.
Preventative Measures
Several preventative measures can protect your Hardie board from damage. Regularly inspect the siding for any signs of damage, such as cracks, chips, or loose boards. Address these issues promptly to prevent further deterioration. Keep trees and shrubs trimmed away from the siding to prevent moisture build-up and potential damage from branches. Proper gutter maintenance is also crucial to divert water away from the foundation and siding. Clogged gutters can cause water to pool against the siding, leading to damage. Consider installing splash guards or other protective measures around downspouts to further prevent water damage. For example, in areas with heavy snow, regular snow removal from the roof prevents ice dams which can cause damage to the siding.
Addressing Minor Damage
Early detection and repair of minor damage can prevent costly repairs down the line. Small cracks can often be repaired using a suitable caulk or patching compound. Chips and scratches can be touched up with paint that matches the existing siding color. For more significant damage, such as severely cracked or broken boards, professional repair or replacement may be necessary. Ignoring minor damage can lead to water penetration, mold growth, and structural problems. For instance, a small crack left untreated could lead to significant water damage during a heavy rain storm.
Visual Examples of Hardie Board Replacement
Seeing is believing when it comes to Hardie board siding. Understanding the visual differences between damaged and properly installed siding, as well as the various styles and colors available, is crucial for making informed decisions about repair or replacement. This section provides visual descriptions to help you assess your own siding and understand the expectations for a successful project.
Damaged Hardie Board Siding
Damaged Hardie board siding exhibits several telltale signs. Color fading is common, particularly in areas exposed to direct sunlight. You might notice significant variations in the original color, with sections appearing bleached or significantly darker than others. Warping is another key indicator, showing as bulging or uneven surfaces. This is often caused by moisture absorption or improper installation. Cracking, ranging from hairline fractures to large splits, indicates structural damage and often points to a need for replacement. These cracks can be accompanied by peeling paint or exposed fiber cement. In severe cases, you might see significant sections of siding missing entirely.
Properly Installed Hardie Board Siding, Hardie board replacement
Conversely, properly installed Hardie board siding presents a clean, uniform appearance. The color should be consistent across the entire surface, with no significant fading or discoloration. The seams between individual panels should be straight, tight, and virtually invisible, creating smooth, unbroken lines. Proper flashing, the thin metal strips used to prevent water penetration, is critical and should be neatly installed around windows, doors, and other vulnerable areas. This will be almost entirely hidden behind the siding, but visible if you carefully examine these transition points. The overall impression is one of solidity, durability, and a professional finish.
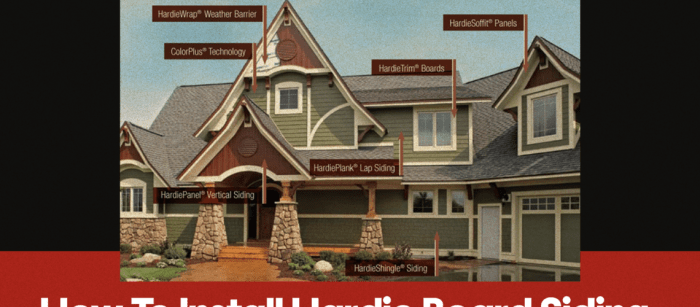
Hardie Board Styles and Colors
Hardie board comes in a wide variety of styles and colors to suit different architectural tastes and home styles. For example, some styles mimic the look of traditional wood clapboard, with varying widths and profiles. Others offer a more modern, sleek appearance with smooth surfaces and larger panels. Color options range from classic neutrals like gray and beige to bolder choices such as deep blues, greens, and reds. The visual differences are significant; a home clad in wide, dark gray lap siding will look drastically different from one with narrow, light beige planks. Choosing the right style and color is important for achieving the desired aesthetic.
Successful Repair Versus Complete Replacement
The visual difference between a successful repair and a complete replacement is often subtle but significant. A successful repair will seamlessly blend with the surrounding siding, showing no obvious signs of patching or repair. The repaired area will match the color and texture of the original siding, and any cracks or damage will be completely invisible. In contrast, a complete replacement will involve removing all the damaged siding and installing new panels. While this results in a more uniform and aesthetically pleasing outcome, it’s a more extensive and costly process. A complete replacement will offer a completely consistent appearance across the whole surface, while a repair may only address localized issues.
Closure
Source: activeexteriorsroofing.com
Replacing or repairing Hardie board siding is a significant investment, but with careful planning and execution, you can ensure a durable and attractive exterior for years to come. Remember to thoroughly assess the condition of your siding, get multiple bids from reputable contractors, and follow proper installation techniques. By taking a proactive approach, you can prevent future problems and enjoy the peace of mind that comes with knowing your home is well-protected. Now go forth and conquer that Hardie board project!
FAQ Guide
Can I replace Hardie board myself?
While DIY is possible for smaller projects, larger jobs often require professional expertise. Consider your skill level and the scope of the work before attempting a DIY replacement.
How long does Hardie board replacement take?
The time needed varies greatly depending on the size of the project and the contractor’s schedule. Expect several days to several weeks for larger projects.
What’s the warranty on Hardie board?
James Hardie offers various warranties, depending on the specific product. Check the manufacturer’s website for details on coverage and limitations.
What are the signs I need a professional inspection?
Extensive damage, uncertainty about the extent of the problem, or if you’re unsure about repair vs. replacement all warrant a professional inspection.
How can I find a reputable contractor?
Check online reviews, get multiple bids, verify licensing and insurance, and ask for references before hiring a contractor.
Comments are closed.