Hardie Board Replacement Cost A Practical Guide
Hardie board replacement cost can vary wildly, depending on several key factors. This guide breaks down the process, from understanding the initial cost estimate to choosing the right contractor and ensuring a long-lasting, beautiful finish. We’ll explore the factors influencing the price, offer tips for saving money, and walk you through the steps of a successful replacement project. Get ready to tackle your Hardie board project with confidence!
Understanding the cost of replacing Hardie board siding is crucial for budgeting and planning your home improvement project. This involves considering not only the material costs but also labor, permits, and potential unforeseen expenses. We’ll delve into specific examples and scenarios to give you a realistic picture of what to expect.
Estimating Hardie Board Replacement Costs

Source: whatisvinyl.com
Replacing Hardie board siding is a significant home improvement project, and understanding the associated costs is crucial for budgeting and planning. This section breaks down the typical expenses involved, helping you create a realistic estimate for your project.
Typical Costs Per Square Foot for Hardie Board Replacement
The cost of Hardie board replacement varies considerably depending on several factors. A general range for materials and labor combined is between $8 and $20 per square foot. The lower end typically reflects simpler projects with readily accessible areas, while the higher end accounts for complex designs, extensive repairs, and difficult-to-reach areas. This price includes the cost of the Hardie board itself, labor for installation, and disposal of old siding. However, it does not include permits or any unforeseen issues.
Sample Cost Estimate
Let’s illustrate with a sample cost estimate for a 1,000 square foot house:
| Item | Cost per Square Foot | Total Cost |
|---|---|---|
| Hardie Board Materials | $4 | $4000 |
| Labor | $4 | $4000 |
| Permits | $1-$3 per square foot (depending on location) | $1000 – $3000 |
| Total Estimated Cost | $9000 – $11000 |
This is a simplified example; actual costs will vary.
Factors Affecting Hardie Board Replacement Costs
Several factors can significantly influence the overall cost. Complex house designs with numerous angles, dormers, or intricate trim work will increase labor costs. Difficult-to-access areas, such as high-pitched roofs or second-story siding, will also add to labor expenses. The need for extensive repairs to underlying sheathing or framing before installation can substantially increase the total cost. Conversely, a simple, single-story house with easy access will generally result in lower costs. Location also plays a role; labor rates vary geographically.
Potential Hidden Costs Associated with Hardie Board Replacement
Hidden costs can easily derail a budget. Unexpected damage discovered during removal of old siding, such as rotted wood or insect infestation, will require additional repairs and materials. The need for extra flashing or caulking to ensure proper water management might arise unexpectedly. Disposal fees for old siding and construction debris can add up, particularly in areas with strict waste disposal regulations. Finally, unforeseen delays due to weather conditions can lead to increased labor costs.
Common Cost Overruns and How to Avoid Them
Careful planning and communication are key to avoiding cost overruns.
- Inadequate assessment of existing damage: A thorough inspection before starting the project can identify hidden problems and prevent unexpected expenses. Obtain multiple bids from reputable contractors to compare assessments and avoid underestimating the scope of work.
- Underestimating labor costs: Factor in potential delays and unforeseen challenges. Choose experienced contractors with a proven track record.
- Ignoring permit fees: Obtain necessary permits before starting the project. These fees can vary greatly by location.
- Insufficient material estimates: Account for waste and potential damage during handling. Purchase materials from reputable suppliers to ensure quality.
- Lack of contingency planning: Include a buffer in your budget for unforeseen expenses. A 10-20% contingency is often recommended for home renovation projects.
The Replacement Process
Source: homedit.com
Replacing Hardie board siding is a multi-step process that requires careful planning and execution to ensure a durable and aesthetically pleasing result. Proper preparation is key to a successful installation, minimizing future problems and maximizing the lifespan of your new siding. This section details the steps involved, highlighting best practices for a professional-looking finish.
Before starting any installation, thorough preparation is crucial. This isn’t just about aesthetics; it directly impacts the longevity and performance of your new Hardie board. Neglecting this stage can lead to premature failure due to improper adhesion or moisture penetration.
Surface Preparation and Cleaning
Preparing the surface involves removing the old siding, inspecting the underlying structure for damage, and thoroughly cleaning the area. This includes removing any loose debris, old caulk, and any remnants of the previous siding. Any damaged sheathing or framing must be repaired or replaced before new Hardie board can be installed. A power washer can be helpful for removing stubborn dirt and grime, ensuring a clean, even surface for optimal adhesion. Allow the surface to completely dry before proceeding to the installation phase.
Hardie Board Installation Process
The installation of Hardie board requires precision and attention to detail. Following these steps will ensure a professional-looking and long-lasting result.
- Measure and Cut: Accurately measure and cut the Hardie board panels to fit each section of the wall. Use a circular saw with a fine-tooth blade designed for fiber cement to achieve clean, straight cuts. Wear appropriate safety gear, including eye protection and a dust mask.
- Installation of Starter Strips: Begin by installing starter strips along the bottom edge of the wall. These provide a level and straight starting point for the rest of the siding. Ensure proper alignment and secure fastening.
- Panel Installation: Install the Hardie board panels, overlapping them according to the manufacturer’s instructions. Typically, a 1/4-inch to 1/2-inch overlap is recommended for proper weather protection. Maintain consistent spacing and alignment throughout the installation process.
- Fastening: Secure each panel using galvanized nails or screws specifically designed for fiber cement siding. Avoid over-driving fasteners, as this can cause cracking or damage to the board. Proper fastening is crucial to withstand wind and other environmental stresses.
- Caulking and Finishing: Apply caulk to all seams and joints to ensure a watertight seal. This prevents moisture intrusion and protects the underlying structure. Use a high-quality, exterior-grade caulk that is compatible with Hardie board. Finally, install trim and other finishing elements to complete the project.
Fastening Methods
Choosing the right fasteners is critical for a secure and long-lasting installation. Galvanized nails and stainless steel screws are commonly used, each offering advantages depending on the specific application and climate. Galvanized nails are generally less expensive and offer good holding power in most conditions. Stainless steel screws provide superior corrosion resistance, especially in coastal areas or environments with high humidity. Always follow the manufacturer’s recommendations for fastener type, spacing, and penetration depth. Proper fastener placement prevents cracking and ensures a long-lasting installation.
Material Selection and Considerations
Choosing the right Hardie board for your siding replacement project significantly impacts both the final cost and the longevity of your home’s exterior. Several factors influence this decision, including budget, desired aesthetic, and the specific environmental conditions your home faces. Understanding the differences between available products is key to making an informed choice.
Hardie Board Types and Price Points
James Hardie offers a range of fiber cement siding products, each with varying price points reflecting their features and performance. Generally, the more durable and aesthetically advanced options command higher prices. For instance, HardiePlank® lap siding, a popular choice, sits at a mid-range price point, while more specialized products like HardieShingle® siding or HardieTrim® may cost more due to their unique shapes and installation requirements. Pricing also varies based on region, supplier, and project scale. It’s crucial to obtain multiple quotes from contractors to compare pricing accurately.
Durability and Longevity of Hardie Board Products
Hardie board’s durability is a key selling point. However, even within the Hardie product line, there are differences. The core composition and the applied finish affect the product’s resistance to impact, moisture, and UV degradation. For example, products with a thicker profile and ColorPlus® technology (factory-applied finish) tend to offer superior longevity and fade resistance compared to those requiring on-site painting. Proper installation is also critical for maximizing the lifespan of any Hardie board product. Neglecting proper flashing and sealing can lead to premature deterioration regardless of the product’s inherent durability.
Aesthetic Qualities of Hardie Board Finishes and Textures
Hardie board comes in a wide array of colors, textures, and profiles. The ColorPlus® technology provides a factory-applied finish that is highly durable and requires less maintenance than field-painted options. However, the range of colors available in ColorPlus® might be more limited compared to field-painted options. The texture options also vary widely, from smooth surfaces mimicking traditional wood siding to deeply textured options that create a more rustic or contemporary look. Consider the architectural style of your home when selecting a finish and texture to ensure a cohesive and visually appealing result.
Environmental Impact of Hardie Board Manufacturing
James Hardie emphasizes sustainable manufacturing practices. Their fiber cement products are made with a significant portion of recycled materials, reducing the environmental impact compared to some other siding options. However, the manufacturing process still involves energy consumption and the release of some emissions. The transportation of materials from manufacturing plants to job sites also contributes to the overall carbon footprint. While not entirely carbon-neutral, Hardie board represents a relatively environmentally friendly option compared to materials like vinyl siding, which often relies heavily on petroleum-based products.
Comparison of Popular Hardie Board Options, Hardie board replacement cost
| Product | Price Point | Durability | Aesthetic Options |
|---|---|---|---|
| HardiePlank® Lap Siding | Mid-range | High; resistant to impact, moisture, and rot | Wide variety of colors and textures; can be field-painted or ColorPlus® |
| HardieShingle® Siding | Higher | High; designed for shingle-style applications | Variety of colors and textures, mimicking traditional wood shingles |
| HardieTrim® | Higher | High; designed for trim and accents | Various profiles and colors to complement siding choices |
Finding and Choosing a Contractor
Finding the right contractor for your Hardie board replacement is crucial for a successful project. A qualified and reputable contractor will ensure the job is done correctly, on time, and within budget. This involves careful research, asking the right questions, and comparing multiple bids.
Contractor Qualification and Reputation
Thorough research is key to finding a qualified and reputable contractor. Start by checking online review sites like Yelp, Angie’s List, or Google My Business. Look for contractors with consistently high ratings and positive feedback from previous clients. Pay attention to both the quantity and quality of reviews – a few glowing reviews might not be as indicative as a large number of positive comments addressing specific aspects of their work. Also, check the Better Business Bureau (BBB) website for any complaints or unresolved issues. A contractor’s reputation is built on their history of completed projects and customer satisfaction. Consider reaching out to past clients directly to inquire about their experiences.
Questions to Ask Potential Contractors
Before hiring any contractor, it’s essential to ask specific questions to assess their qualifications and suitability for your project. This helps ensure you’re making an informed decision.
- Inquire about their experience with Hardie board installation and replacement, including the number of similar projects they’ve completed.
- Ask for references and contact information for previous clients. This allows you to directly assess their work quality and professionalism.
- Clarify their process for handling permits and inspections, ensuring compliance with local building codes.
- Request a detailed breakdown of the project cost, including materials, labor, and any potential additional fees.
- Determine their warranty policy and what it covers, protecting your investment against potential defects or workmanship issues.
- Inquire about their insurance coverage and licensing, verifying their legitimacy and protecting yourself from liability.
- Ask about their project timeline and expected completion date.
- Discuss their communication strategy and how they will keep you informed throughout the project.
The Importance of Multiple Quotes
Obtaining multiple quotes from different contractors is crucial for comparing pricing and services. This competitive bidding process ensures you’re not overpaying and helps you identify the best value for your money. Don’t solely focus on the lowest price; consider the overall package, including experience, reputation, and warranty. For example, if Contractor A quotes $5,000 but has numerous negative reviews, while Contractor B quotes $5,500 with excellent feedback, the slightly higher price might be worth the peace of mind.
Reviewing Contracts and Payment Terms
Carefully review the contract before signing it. Ensure all aspects of the project, including the scope of work, payment schedule, and warranty, are clearly defined. Understand the payment terms and avoid paying the entire amount upfront. A common practice is to pay a portion upfront, another portion upon completion of significant milestones, and the final payment upon project completion and your satisfaction. For example, a contract might stipulate 25% upfront, 50% upon completion of framing and installation of the Hardie board, and the final 25% upon final inspection and your approval.
Verifying Contractor Licensing and Insurance
Verify that the contractor holds the necessary licenses and insurance. This protects you from liability in case of accidents or damages during the project. Contact your local licensing board to confirm the contractor’s license is valid and up-to-date. Request proof of general liability insurance and workers’ compensation insurance. This demonstrates their commitment to safety and protects you from potential financial burdens in case of on-site incidents.
Visual Representation of Hardie Board Replacement
Source: homeguide.com
Replacing Hardie board siding offers a noticeable improvement to a home’s exterior. Understanding the visual changes involved, from identifying damaged areas to appreciating the finished product, is key to ensuring a successful project. This section details the visual aspects of the replacement process, from the problems to the professional solution.
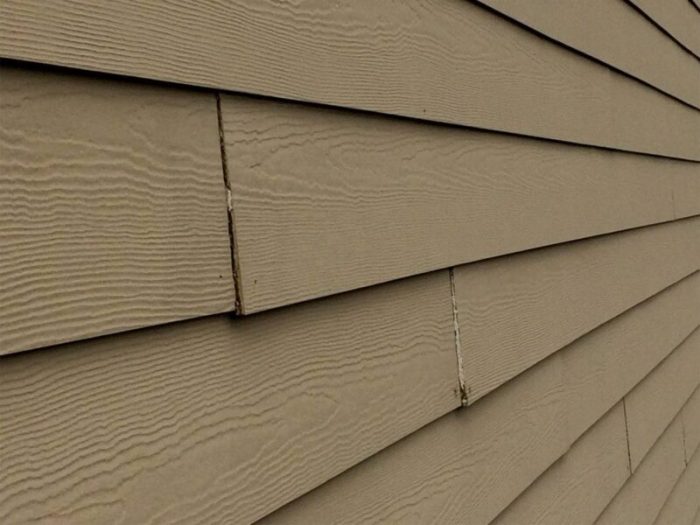
Damaged Hardie board often shows signs of wear and tear. Common issues include cracking, especially around fasteners or edges, where the material is most vulnerable. You might also see discoloration from sun exposure, water damage showing as dark stains or warping, and dents or holes from impacts. Significant damage can lead to significant visual impairment, making the siding look uneven and unsightly. Sometimes, insect infestation can create visible damage, resulting in holes and compromised structural integrity.
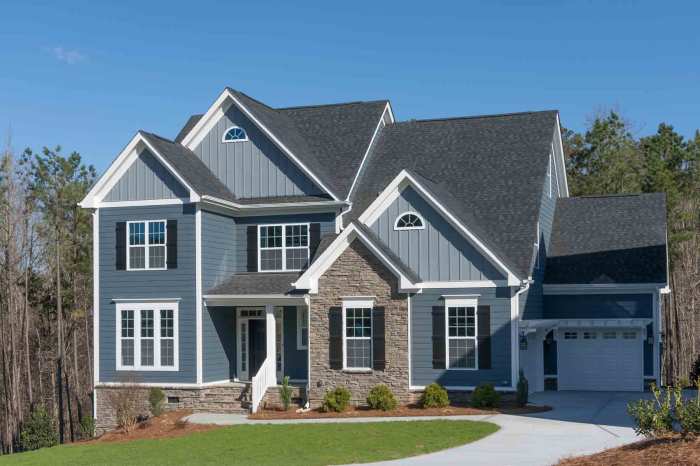
Visual Differences Between Old and New Hardie Board
The difference between old and new Hardie board installation is striking. Old siding might exhibit the issues mentioned above: uneven coloring, noticeable gaps between panels, and possibly even missing sections. New Hardie board, on the other hand, presents a uniform, clean appearance. The color will be consistent across all panels, the cuts will be precise, and the spacing between boards will be even and consistent. The overall effect is a smoother, more modern look, instantly enhancing the home’s curb appeal. The new siding will also show a fresh, vibrant color compared to the faded look of the old material.
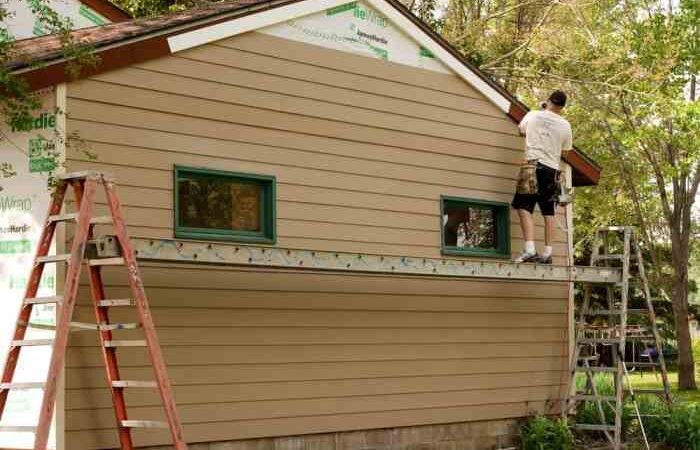
Hardie Board Installation Process
Proper Hardie board installation is a multi-step process that requires precision and attention to detail. First, the damaged or old siding is removed, ensuring the underlying sheathing is sound. New sheathing may be required if the original is damaged or deteriorated. Next, the new Hardie board panels are cut to size, allowing for proper overlap and expansion gaps. These panels are then fastened securely to the sheathing, using galvanized nails or screws at the proper spacing. The process involves ensuring each panel is straight and aligned with adjacent ones. Caulking is applied along all seams and edges to prevent water intrusion, creating a weathertight seal. Flashing is also crucial, especially around windows and doors, to divert water away from the siding and prevent leaks. This flashing is typically installed under the siding, creating a protective barrier.
Finished Look of Professionally Installed Hardie Board
A professionally installed Hardie board siding job is characterized by its clean lines and uniform appearance. The panels are perfectly aligned, with consistent spacing between them. There are no visible gaps or overlaps, and the caulking is neatly applied, barely noticeable except for its function. The cuts are precise and straight, with no jagged edges or imperfections. The overall impression is one of quality and durability, enhancing the home’s aesthetic value significantly. The finished look is a smooth, even surface that showcases the chosen color and texture of the Hardie board consistently across the entire exterior. The attention to detail is apparent, demonstrating the skill and experience of the installer.
Final Wrap-Up: Hardie Board Replacement Cost

Source: elitehomeexteriorsnw.com
Replacing Hardie board siding is a significant investment, but with careful planning and the right approach, you can achieve a stunning and durable result. By understanding the factors that influence cost, selecting the appropriate materials, and hiring a reputable contractor, you can ensure a smooth process and a beautiful, long-lasting home exterior. Remember to always get multiple quotes and thoroughly review contracts before committing to any project. Now you’re equipped to tackle your Hardie board replacement with confidence and know-how!
FAQ Guide
What is the average lifespan of Hardie board?
Hardie board siding typically lasts 30-50 years, depending on the climate and maintenance.
Can I replace Hardie board myself?
While DIY is possible for smaller areas, professional installation is generally recommended for larger projects to ensure proper installation and warranty coverage.
What are some signs my Hardie board needs replacing?
Look for cracks, water damage, significant discoloration, loose or missing pieces, and signs of pest infestation.
How do I find a reputable contractor?
Check online reviews, get multiple quotes, verify licensing and insurance, and ask for references.
What type of warranty does Hardie board come with?
Warranty details vary by product and manufacturer; check the manufacturer’s website for specifics.
Comments are closed.