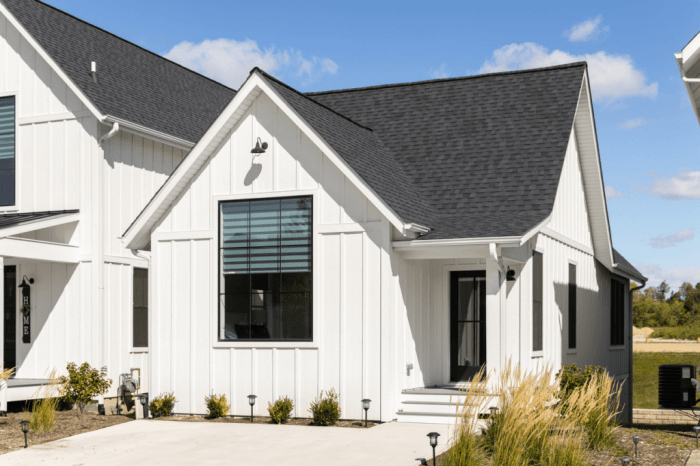
Hardie Board Siding Replacement A Complete Guide
Hardie board siding replacement might sound daunting, but it’s a project that can dramatically improve your home’s curb appeal and longevity. This guide walks you through everything you need to know, from identifying the need for replacement to choosing the right contractor and maintaining your new siding for years to come. We’ll cover material properties, installation techniques, cost estimations, and more, providing you with the knowledge to make informed decisions every step of the way.
We’ll explore the benefits of Hardie board – its durability, weather resistance, and low maintenance – compared to other siding options. Learn to spot signs of damage that signal it’s time for replacement, and understand the process of assessing the extent of the damage to determine whether repair or full replacement is necessary. We’ll also equip you with a step-by-step guide for installation, including crucial details like flashing and sealing, and help you create a budget that fits your needs.
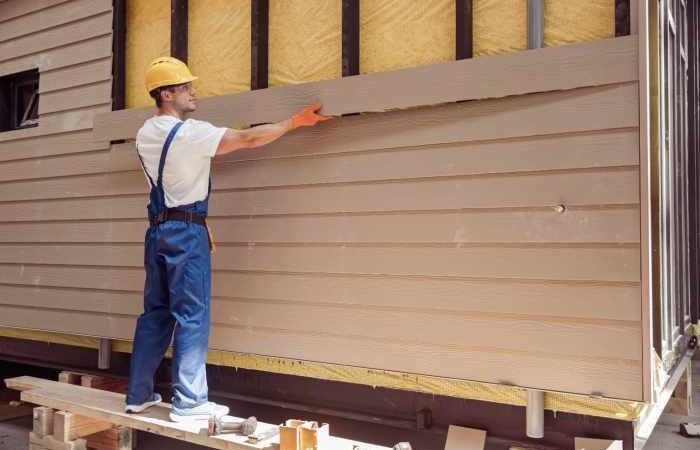
Hardie Board Siding

Source: advanceroofingllc.com
Hardie board siding, a popular choice for homeowners, offers a durable and attractive exterior cladding option. It’s known for its strength, resistance to damage, and relatively low maintenance requirements. Let’s delve into the specifics of this material.
Hardie Board Siding Composition and Manufacturing
Hardie board siding is primarily composed of cement, cellulose fibers, and other additives. The manufacturing process involves mixing these ingredients, forming them into panels under high pressure, and then curing them to achieve their characteristic strength and durability. The final product is a fiber cement composite that is resistant to fire, insects, and rot, unlike many other siding materials. Different finishes are applied during the manufacturing process to mimic the look of wood, stucco, or other textures.
Hardie Board Siding Lifespan and Climate Conditions
The lifespan of Hardie board siding is significantly influenced by the climate. In milder climates with moderate rainfall and temperature fluctuations, Hardie board siding can last 50 years or more with proper maintenance. However, in harsh climates with extreme temperature swings, heavy rainfall, or prolonged exposure to direct sunlight, the lifespan might be slightly shorter, potentially ranging from 30 to 40 years. Regular maintenance, such as cleaning and repainting as needed, can extend its lifespan considerably. For instance, a home in Arizona might require more frequent repainting than one in Oregon due to the intense UV exposure.
Hardie Board Siding Durability Compared to Other Materials
Compared to vinyl siding, Hardie board offers superior durability and resistance to impact damage. Vinyl siding can dent or crack more easily, especially in colder climates where it becomes brittle. Wood siding, while aesthetically pleasing, is susceptible to rot, insect infestation, and requires significantly more maintenance than Hardie board. While more expensive upfront, Hardie board’s longevity often makes it a more cost-effective option in the long run. It also stands up better to extreme weather events like hailstorms, a common concern for homeowners in many regions.
Hardie Board Siding Types and Warranties
Choosing the right Hardie board siding type depends on your budget and aesthetic preferences. Here’s a comparison of some common types and their warranties (Note: Warranty details can vary based on location and specific product lines, so always check with the manufacturer for the most up-to-date information):
| Siding Type | Warranty Length | Cost per square foot | Key Features |
|---|---|---|---|
| HardiePlank® Lap Siding | 30 years | $3 – $8 | Classic lap siding look, durable, paintable |
| HardieShingle® Siding | 30 years | $4 – $9 | Shingle-style appearance, resists wind and moisture |
| HardiePanel® Vertical Siding | 30 years | $3 – $7 | Modern, clean lines, easy installation |
| HardieSoffit® and Trim | 30 years | $2 – $6 | Durable and resistant to moisture damage |
Identifying the Need for Replacement
Knowing when to repair versus replace your Hardie board siding is crucial for maintaining your home’s curb appeal and structural integrity. While Hardie board is durable, it’s not indestructible, and ignoring damage can lead to more extensive and costly problems down the line. This section will help you identify signs of needed replacement and assess the extent of damage.
Hardie board siding, despite its resilience, shows signs of wear and tear over time. Common indicators that replacement might be necessary include significant discoloration, particularly if it’s uneven and doesn’t respond to cleaning; extensive cracking, especially if the cracks are deep or spider-webbing; evidence of water damage, such as swelling, rotting, or the presence of mold; and physical damage from impacts, such as dents or holes that compromise the siding’s protective layer. Minor surface scratches or fading are usually cosmetic and repairable, but larger issues require closer inspection.
Repair Versus Replacement
Repairing Hardie board siding is often a cost-effective solution for minor damage. Small cracks, minor dents, and localized discoloration can usually be addressed with patching, caulking, and repainting. However, when damage is extensive, affecting a large area of the siding or compromising its structural integrity, complete replacement is the more practical and long-term solution. For example, if water damage has caused significant rotting behind a section of siding, simply patching the visible damage won’t solve the underlying problem. Similarly, widespread cracking or discoloration that covers a significant portion of a wall indicates a more systemic issue requiring full replacement.
Assessing the Extent of Damage
A thorough inspection is essential to determine the scope of the problem. Start by visually examining the entire siding, paying close attention to areas prone to damage, such as corners, edges, and areas exposed to direct sunlight or moisture. Look for any signs of cracking, warping, discoloration, or damage from impact. If you find any issues, carefully assess their severity and extent. Measure the affected areas and note the type of damage. For example, a small crack might only require a patch, while extensive water damage could necessitate replacing several panels. Consider taking photographs to document the damage and aid in estimating the necessary repairs or replacement. In cases of significant damage or uncertainty, consulting a professional siding contractor is recommended.
Hardie Board Siding Replacement Checklist
Before deciding on repair or replacement, use this checklist to thoroughly evaluate your siding:
- Inspect all sides of your home for signs of damage, including cracking, warping, discoloration, and impact damage.
- Assess the severity and extent of any damage found. Measure affected areas and document findings with photos.
- Check for signs of water damage, such as swelling, rotting, or mold growth.
- Determine if the damage is localized and repairable or widespread, requiring replacement.
- Consider the age of your siding. Older siding may be more prone to damage and require replacement.
- Consult with a qualified siding contractor for a professional assessment and quote.
Replacement Process
Source: odysseyremodeling.com
Replacing Hardie board siding is a multi-step process requiring careful planning and execution. Proper preparation and attention to detail will ensure a long-lasting, attractive, and weather-resistant finish. This section Artikels the key steps, considerations, and best practices for a successful siding replacement.
Preparing the Surface
Before any new siding goes up, thorough preparation is crucial. This involves a complete inspection of the underlying sheathing for any rot, damage, or insect infestation. Any damaged areas must be repaired or replaced before proceeding. Next, a thorough cleaning is necessary to remove dirt, debris, loose paint, and any existing caulking. A pressure washer is often helpful for this, but be mindful of not damaging the underlying sheathing. Finally, allow the surface to dry completely before beginning installation. This prevents moisture issues that can lead to problems down the line.
Removing Existing Siding
Carefully remove the existing Hardie board siding, starting from the top and working your way down. Use a pry bar to carefully loosen the siding, avoiding damage to the underlying sheathing. [Image: A worker carefully using a pry bar to remove a section of Hardie board siding, wearing safety glasses and gloves. Note the use of a small pry bar to avoid damage to the underlying wall.] Dispose of the old siding responsibly, following local regulations for construction waste disposal. Remember to always wear appropriate safety gear, including safety glasses and work gloves.
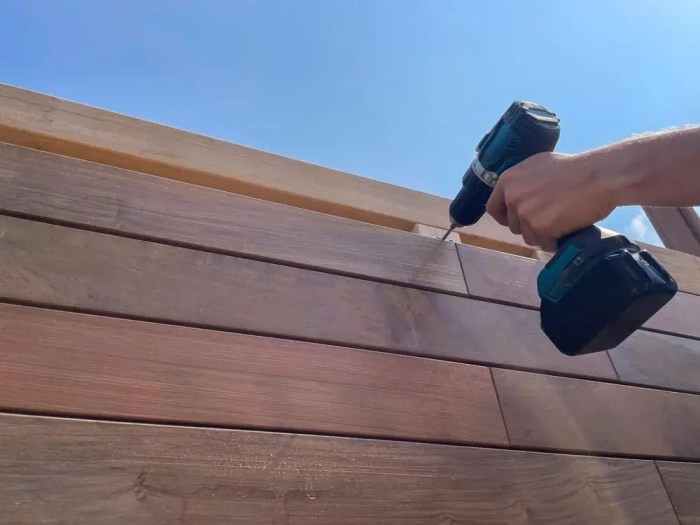
Installing New Hardie Board Siding
Installation begins by establishing a level starting point. [Image: A close-up shot showing a level being used to ensure the first piece of Hardie board siding is perfectly aligned and plumb. Notice the use of a chalk line to mark the level line.] The first piece of siding is usually installed at a corner or edge, ensuring proper alignment and overlap with the existing trim. Use galvanized nails specifically designed for Hardie board. [Image: A worker driving nails into the Hardie board siding, ensuring proper spacing and depth. Note the use of a nail gun for efficiency and consistency.] Each subsequent piece should be carefully fitted and nailed, maintaining consistent spacing and overlap. Remember to leave expansion gaps as specified by the manufacturer’s instructions. This allows for natural expansion and contraction due to temperature changes.
Flashing and Sealing
Proper flashing is crucial for preventing water penetration. [Image: A detailed image showing the correct installation of flashing around windows and doors. The flashing is properly overlapped and sealed to create a waterproof barrier.] Flashing should be installed before siding is applied, ensuring a watertight seal around windows, doors, and other penetrations in the wall. Caulk all seams and joints between siding pieces and around windows and doors using a high-quality exterior-grade caulk. [Image: A close-up of a worker carefully applying caulk to the seams between Hardie board siding pieces, using a caulking gun. Note the smooth, even application of the caulk.] This prevents water from entering the wall cavity.
Finishing Touches
Once all siding is installed, inspect for any gaps or imperfections. Touch up any caulk as needed. [Image: A final view of the newly installed Hardie board siding, showcasing the clean lines and even spacing. The work is complete and ready for painting or staining]. Finally, prime and paint or stain the Hardie board siding according to the manufacturer’s recommendations. This protects the siding from the elements and enhances its appearance.
Cost Estimation and Budgeting
Replacing your Hardie board siding is a significant investment, so understanding the costs involved is crucial. Several factors influence the final price, and careful budgeting is essential to avoid unexpected expenses. This section will break down the cost components and provide a framework for creating your project budget.
Factors Influencing Hardie Board Siding Replacement Costs
The total cost of your Hardie board siding replacement project depends on a combination of factors. These include the size of your home’s exterior surface area, the complexity of the job (e.g., intricate trim work, multiple stories), the type and finish of Hardie board chosen, labor rates in your region, and the cost of permits and other associated fees. Labor typically constitutes a significant portion of the overall cost, often exceeding material costs. Permits are necessary in most jurisdictions and their cost varies depending on local regulations. Material costs will differ based on the type and quantity of Hardie board required.
Sample Budget Spreadsheet for Hardie Board Siding Replacement
Creating a detailed budget spreadsheet helps manage expenses effectively. Below is a sample illustrating potential costs. Remember, these are estimates, and your actual costs may vary.
| Item | Quantity | Unit Cost | Total Cost |
|---|---|---|---|
| Hardie Board Siding (e.g., 12″ x 16′) | 100 | $30 | $3000 |
| Fasteners (nails, screws) | 1000 | $0.10 | $100 |
| Caulk and Sealant | 5 | $20 | $100 |
| Primer | 2 | $50 | $100 |
| Paint (exterior grade) | 3 | $75 | $225 |
| Labor (per day) | 5 | $500 | $2500 |
| Permits | 1 | $200 | $200 |
| Waste Removal | 1 | $150 | $150 |
| Total Estimated Cost | $6475 |
Cost Comparison of Hardie Board Siding Types and Finishes
Hardie board siding comes in various types and finishes, each affecting the overall cost. For example, lap siding generally costs less per square foot than vertical siding due to simpler installation. Premium finishes, such as those with textured surfaces or enhanced color palettes, typically command higher prices. Consider the long-term value and aesthetic appeal when comparing options. A higher initial cost for a durable, aesthetically pleasing finish might prove more cost-effective in the long run compared to cheaper options that may require more frequent maintenance or replacement.
Finding Reputable Contractors and Obtaining Competitive Bids
Securing competitive bids from multiple reputable contractors is crucial for getting the best value for your money. Start by checking online reviews and seeking referrals from friends and family. Verify contractors’ licenses and insurance. Request detailed proposals outlining the scope of work, materials to be used, payment schedules, and warranty information. Compare bids carefully, considering not only the total cost but also the contractors’ experience, reputation, and proposed timeline. Don’t hesitate to ask clarifying questions to ensure you fully understand the terms of each bid before making a decision.
Maintenance and Long-Term Care
Proper maintenance is key to extending the life of your Hardie board siding and preserving its attractive appearance. Regular cleaning and inspections will help prevent costly repairs down the line, ensuring your investment remains protected for years to come. A proactive approach will significantly reduce the likelihood of major issues arising.
Regular Cleaning and Inspection
Regular cleaning and visual inspections are the cornerstones of Hardie board siding maintenance. Ideally, you should inspect your siding at least twice a year, once in spring and once in autumn. During these inspections, look for any signs of damage, such as cracks, loose boards, or areas showing signs of moisture penetration. Pay close attention to areas prone to damage, such as corners, seams, and around windows and doors. Cleaning should be done at least once a year, more frequently if you live in an area with heavy pollen or pollution. Early detection of problems allows for prompt repairs, preventing small issues from escalating into larger, more expensive problems.
Addressing Common Issues
Hardie board siding, while durable, is not immune to damage. Understanding how to address common issues is crucial for long-term care.
Staining
Staining on Hardie board siding can often be removed with a simple cleaning (detailed methods below). Persistent stains may require a more aggressive approach, such as using a pressure washer (carefully, to avoid damage) or a specialized cleaning solution designed for fiber cement siding. For stubborn stains, consider consulting a professional siding cleaning service. Prevention is key; regular cleaning minimizes the likelihood of stains setting in.
Cracking
Cracks in Hardie board siding are usually caused by impact damage or settling of the house. Small cracks can often be filled with a high-quality caulk designed for exterior use, ensuring a waterproof seal. Larger cracks may require replacing the damaged board. Careful attention to the installation process during replacement will help prevent future cracking.
Moisture Damage
Moisture damage, manifested as discoloration, swelling, or rot, is a serious issue that needs immediate attention. This often indicates a problem with the flashing or caulking around windows and doors, or potential water intrusion behind the siding. Addressing the source of the moisture is crucial; simply repairing the visible damage may not solve the underlying problem. In cases of significant moisture damage, professional assistance may be necessary.
Recommended Cleaning Products and Techniques
A simple solution of mild detergent and water is usually sufficient for regular cleaning. Avoid abrasive cleaners or harsh chemicals, as these can damage the siding’s surface.
Here’s a recommended approach:
- Preparation: Inspect the siding for loose debris. Use a soft-bristled brush or broom to remove any loose dirt, cobwebs, or other debris.
- Cleaning Solution: Mix a solution of mild detergent (like dish soap) and water in a bucket. Use a ratio of approximately 1 ounce of detergent per gallon of water.
- Application: Apply the solution to the siding using a soft-bristled brush, sponge, or a low-pressure garden hose with a spray nozzle. Avoid high-pressure washing, which can damage the siding.
- Rinsing: Thoroughly rinse the siding with clean water to remove all traces of the cleaning solution. Allow the siding to air dry completely.
- Inspection: After drying, inspect the siding for any remaining stains or damage. Address any issues as needed.
For more stubborn stains or mildew, you can use a solution of bleach and water (1 part bleach to 3 parts water). Always test this solution on a small, inconspicuous area first to ensure it doesn’t damage the siding’s finish. Wear protective gloves and eyewear when working with bleach.
Choosing the Right Contractor: Hardie Board Siding Replacement
Replacing your Hardie board siding is a significant investment, so choosing the right contractor is crucial for a successful project. Selecting a qualified professional ensures quality workmanship, adherence to timelines, and protection against potential problems down the line. This section will guide you through the process of finding and vetting the ideal contractor for your siding replacement.
Contractor Qualifications and Experience
Finding a contractor with the right qualifications and experience is paramount. Look for contractors specializing in Hardie board installation; this indicates familiarity with the material’s specific requirements and potential challenges. Years of experience are valuable, but equally important is a demonstrable track record of successful Hardie board projects. Check for certifications from relevant organizations, such as the James Hardie Certified Installer program. This certification signifies the contractor has undergone training and met specific standards for Hardie board installation. Consider the contractor’s familiarity with local building codes and regulations; this knowledge ensures compliance and avoids potential delays or issues. A reputable contractor will also provide you with a portfolio showcasing their previous work, including contact information for past clients.
Vetting Contractors and Checking References
Thoroughly vetting potential contractors is essential. Start by checking online reviews and ratings on platforms like Yelp, Google Reviews, and the Better Business Bureau. Look for consistent positive feedback and address any negative reviews to understand the contractor’s response to challenges. Don’t hesitate to contact several references provided by the contractor. Ask detailed questions about their experience working with the contractor, the quality of the work, adherence to timelines, and how any issues were handled. Request photos of completed projects similar in scope and style to your own. Comparing these visuals to the contractor’s portfolio will help validate their claims. A thorough vetting process will greatly reduce the risk of encountering unexpected problems.
Contract Types and Their Implications
Understanding different contract types is vital. A fixed-price contract Artikels all costs upfront, offering budget certainty but potentially limiting flexibility if unforeseen issues arise. A cost-plus contract involves paying for materials and labor as the project progresses, offering flexibility but potentially leading to higher costs if not managed carefully. Time and materials contracts are similar to cost-plus but often involve an hourly rate for labor, offering flexibility but requiring careful monitoring of hours worked. Carefully review each contract’s terms and conditions, paying close attention to payment schedules, change order procedures, and dispute resolution mechanisms. Before signing, ensure you understand all aspects of the agreement and feel comfortable with the chosen contract type. Consider consulting with a legal professional if you have any concerns.
Permits and Insurance, Hardie board siding replacement
Ensuring your contractor obtains the necessary permits and carries adequate insurance is crucial for protecting your investment. The contractor should be responsible for securing all required building permits. This demonstrates compliance with local regulations and protects you from potential legal issues. Verify that the contractor carries general liability insurance and workers’ compensation insurance. General liability insurance protects you from financial losses if accidents or damages occur on your property during the project. Workers’ compensation insurance protects the contractor’s employees in case of on-the-job injuries, preventing potential liability from falling on you. Request copies of the insurance certificates to confirm coverage before commencing the project. This proactive approach minimizes potential risks and ensures a smoother, legally sound project.
Last Word
Source: fmfconstruction.com
Replacing your Hardie board siding is a significant investment, but with careful planning and the right approach, it’s a project that pays off handsomely. By understanding the material, the process, and the costs involved, you can ensure a smooth and successful renovation. Remember to thoroughly vet your contractor, maintain your new siding diligently, and enjoy the lasting beauty and protection it provides for your home. This guide serves as a roadmap; use it to navigate your Hardie board siding replacement project confidently.
Frequently Asked Questions
Can I replace Hardie board siding myself?
While possible for smaller areas with basic DIY skills, replacing large sections is best left to professionals. It’s physically demanding and requires specialized tools and knowledge for proper installation.
How long does Hardie board siding replacement take?
The timeframe depends on the size of your home and the complexity of the project. Expect several days to a couple of weeks for a typical house.
What’s the warranty on Hardie board siding?
Warranties vary by product type and finish. Check the manufacturer’s website or your contractor for specifics; they generally cover defects in materials and workmanship.
What are the common causes of Hardie board damage?
Common causes include impact damage (e.g., hail, falling branches), moisture intrusion (leading to rot), and improper installation.
How often should I clean my Hardie board siding?
Annual cleaning with a pressure washer (low pressure setting) is recommended to remove dirt and debris. More frequent cleaning might be needed depending on your climate and environment.
Comments are closed.