Replacing Siding with Hardie Board
Replacing siding with Hardie board is a smart home improvement project offering durability and curb appeal. This guide walks you through the process, from material selection and cost estimation to installation and troubleshooting. We’ll cover everything from removing old siding to finishing touches, ensuring a successful upgrade for your home’s exterior.
Hardie board, a fiber cement siding, boasts superior resistance to fire, moisture, insects, and impact compared to traditional materials like wood or vinyl. Its longevity translates to long-term cost savings, making it a worthwhile investment. This detailed guide covers choosing the right Hardie board for your home’s style, budgeting effectively, and tackling common installation challenges.
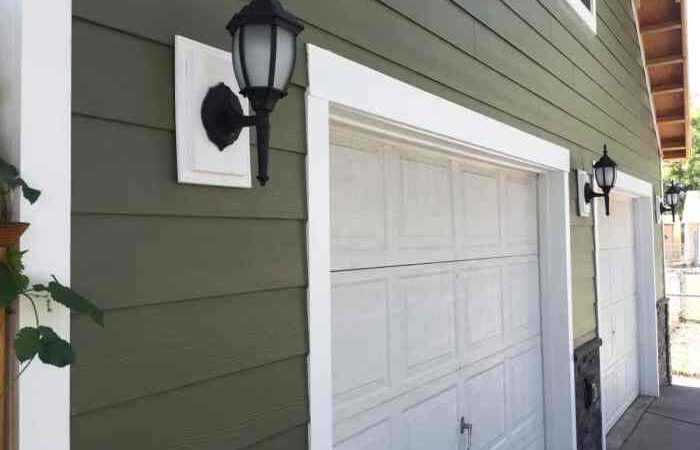
Hardie Board Siding
Source: sawshub.com
Hardie board siding, a popular choice for homeowners, offers a durable and attractive alternative to traditional siding materials. Its cement-composite construction provides exceptional protection against the elements and contributes to a long-lasting, low-maintenance exterior. Let’s delve into the specifics of this material.
Hardie Board Siding Composition and Manufacturing
Hardie board siding is primarily composed of cement, cellulose fibers, and other additives. The manufacturing process involves mixing these ingredients, forming them into panels under high pressure, and then curing them in a controlled environment. This process results in a dense, strong, and weather-resistant product. The final product is then cut to size and potentially pre-primed for painting.
Hardie Board Siding Durability and Longevity
Compared to other siding materials, Hardie board boasts superior durability and longevity. Its cement composition makes it highly resistant to damage from impact, rot, and insect infestation. Unlike wood, it won’t rot or attract termites. Unlike vinyl, it won’t crack or fade easily under harsh sunlight. Properly installed and maintained, Hardie board siding can last for 50 years or more, significantly outperforming vinyl and wood siding in terms of lifespan.
Hardie Board Siding Resistance to Damage
Hardie board offers excellent resistance to a variety of damaging elements. Its inherent fire resistance makes it a safer option compared to wood siding. Its moisture resistance prevents water damage, reducing the risk of mold and rot. Its dense composition makes it highly resistant to insect damage, unlike wood siding. While it can be damaged by significant impact, its strength is superior to vinyl and aluminum siding.
Hardie Board Siding Maintenance Requirements
Hardie board siding requires minimal maintenance. Regular cleaning with water and a soft brush will remove dirt and debris. While it’s resistant to rot and insect damage, occasional inspections are recommended to identify and address any potential issues promptly. Repainting may be needed every 10-15 years depending on climate and exposure to sunlight, offering flexibility in choosing exterior colors.
Comparison of Siding Materials
| Feature | Hardie Board | Vinyl | Wood | Aluminum |
|---|---|---|---|---|
| Cost | High | Medium-Low | Medium-High | Medium |
| Lifespan (Years) | 50+ | 20-30 | 15-25 | 30-40 |
| Maintenance | Low | Low | High | Low |
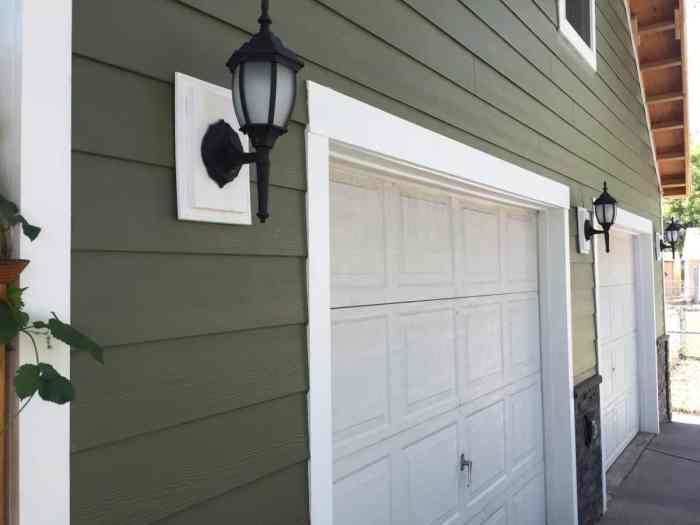
Replacing Existing Siding with Hardie Board
Source: storables.com
Replacing your home’s siding with Hardie board offers a durable and attractive upgrade. This process, while involved, is manageable with careful planning and execution. This guide provides a step-by-step approach to ensure a successful installation.
Removing Existing Siding
Removing the old siding is the first crucial step. Safety is paramount; wear appropriate safety gear, including gloves, eye protection, and a dust mask. The method for removal will depend on the type of siding currently installed. For vinyl or aluminum siding, carefully pry off each panel starting from the bottom, working your way up. For wood siding, you might need a pry bar and hammer to carefully remove each board. Remember to be gentle to avoid damaging the underlying sheathing. Dispose of the old siding responsibly according to local regulations.
Preparing the House Exterior
Once the old siding is removed, thoroughly inspect the house’s exterior walls. Repair any damaged sheathing, replacing rotten or damaged sections with new plywood or OSB. Fill any gaps or cracks with exterior-grade caulk or sealant. Ensure all nails and fasteners are secure. This preparation is vital for a long-lasting, secure siding installation. A well-prepared surface prevents future problems and ensures the new siding adheres properly. Consider using a pressure washer to clean the exterior walls, removing any loose debris or dirt before proceeding.
Installing Hardie Board Siding
Begin by installing starter strips at the bottom of the wall, providing a level base for the first row of siding. Then, install the Hardie board panels, overlapping them according to the manufacturer’s instructions. Typically, this involves a 1/4″ to 1/2″ overlap. Use galvanized nails or screws specifically designed for Hardie board, spacing them appropriately to avoid splitting the panels. Pre-drill pilot holes to prevent splitting, especially with thicker panels. Remember to maintain consistent spacing between fasteners.
Proper Fastening Techniques and Visual Representation
Proper fastening is critical for a long-lasting installation. Here’s a textual representation illustrating the process:
“`
+—————–+
| |
| Hardie Board | <-- Nail/Screw every 6-8 inches
| |
+--------+--------+
|
| Flashing (at windows and doors)
|
+--------+--------+
| |
| Sheathing |
+-----------------+
Caulking should be applied to all seams and joints to prevent water penetration.
```
The image shows a Hardie board panel fastened to the sheathing. Note the consistent spacing of fasteners and the placement of flashing around window and door openings. Flashing prevents water from seeping behind the siding. Caulking creates a watertight seal around all joints and seams.
Finishing the Installation
Once all the siding is installed, install trim pieces around windows, doors, and corners. These pieces provide a finished look and protect the edges of the siding. Caulk all gaps and joints thoroughly. Finally, clean up any debris, ensuring a neat and professional finish. A thorough inspection of the completed work is recommended to check for any loose panels, gaps, or other issues that need attention before painting or staining.
Cost Considerations and Budgeting for Hardie Board Siding Replacement
Replacing your siding with Hardie board is a significant investment, but it can dramatically improve your home’s curb appeal and longevity. Understanding the costs involved upfront is crucial for a smooth and stress-free project. This section breaks down the various factors that influence the overall price and provides guidance on creating a realistic budget.
Factors Influencing Hardie Board Siding Replacement Costs, Replacing siding with hardie board
Several key factors significantly impact the final cost of your Hardie board siding project. These include the size of your home, the complexity of the existing siding removal, the chosen Hardie board style and color, labor rates in your region, and any unforeseen issues discovered during the installation process. A larger home with intricate architectural details will naturally cost more than a smaller, simpler structure. Similarly, removing old asbestos siding adds considerable expense and complexity.
Cost Breakdown: Materials, Labor, Permits, and Disposal
The total cost is comprised of several key components. Let’s examine each one.
- Materials: This is the largest portion of the budget, encompassing the Hardie board panels themselves, fasteners, flashing, trim, and caulking. Prices vary based on the chosen product line (e.g., HardiePlank, HardieShingle), color, and quantity needed. Expect to pay more for premium colors or specialized textures.
- Labor: Labor costs represent a substantial portion of the overall expense. The hourly rate of skilled siding installers varies geographically. The complexity of the job—including the need for specialized techniques or significant repairs to underlying sheathing—also impacts labor costs.
- Permits: Building permits are necessary in most jurisdictions before starting any exterior home renovation. The cost of these permits varies by location and the scope of the project.
- Disposal: Proper disposal of old siding materials is crucial. Costs associated with this often depend on the volume of waste and local regulations regarding disposal of construction debris. Recycling options may be available, potentially reducing disposal fees.
Obtaining Competitive Quotes from Contractors
Getting multiple quotes is essential for ensuring you’re getting a fair price. When soliciting quotes, provide detailed information about your project, including the square footage of your home’s siding, the type of Hardie board you’ve chosen, and any special features or requirements. Compare not only the total cost but also the level of detail in the quotes, the contractors’ experience with Hardie board installation, and their references and insurance coverage.
Creating a Realistic Budget for the Project
Creating a realistic budget involves careful planning and consideration of all potential costs. Begin by gathering quotes from at least three reputable contractors. Then, factor in a contingency buffer of 10-15% to account for unforeseen expenses or price fluctuations. Consider financing options if necessary, and be prepared to prioritize certain aspects of the project if your budget is tight.
Sample Budget Breakdown for a Typical Home Siding Replacement Project
This is a sample budget and may vary depending on your specific circumstances. Remember, this is an *estimate* and actual costs may differ.
- Materials: $10,000 – $20,000 (depending on house size and material choices)
- Labor: $8,000 – $15,000 (depending on house size and labor rates)
- Permits: $500 – $1,500 (depending on local regulations)
- Disposal: $500 – $1,000 (depending on waste volume and disposal methods)
- Contingency (10%): $1,800 – $3,500 (10% of total estimated cost)
- Total Estimated Cost: $20,800 – $41,000
Note: This is a broad range. A small home might fall at the lower end, while a large, complex home could exceed the higher end. Always get detailed, itemized quotes from contractors for an accurate assessment.
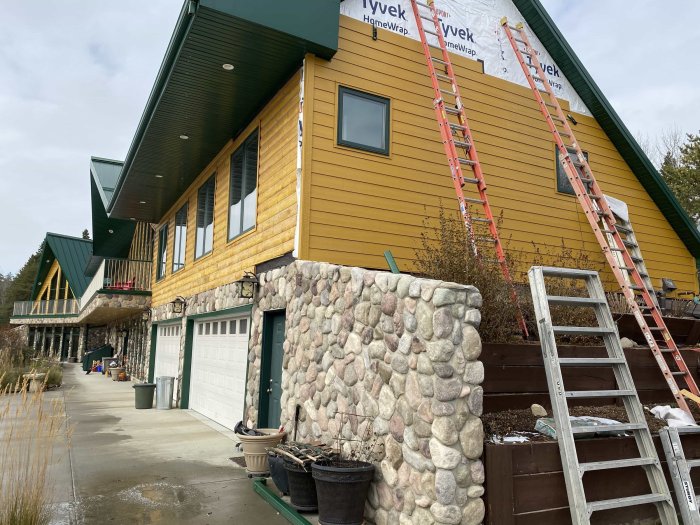
Choosing the Right Hardie Board Siding for Your Home

Source: wilsonexteriors.com
Selecting the perfect Hardie board siding involves more than just picking a color. The right choice complements your home’s architecture, enhances its curb appeal, and ensures lasting durability. Consider factors like your home’s style, climate, and personal preferences to make an informed decision.
Hardie Board Siding Types and Styles
Hardie offers a variety of siding profiles to suit different tastes and architectural styles. Their product line includes lap siding, mimicking traditional wood clapboard, with varying widths and thicknesses for a customized look. They also offer vertical siding, which provides a more modern aesthetic, and shingle siding, ideal for creating a rustic or craftsman-style feel. Each profile offers distinct textural and visual characteristics. For example, the lap siding can create a classic, clean look, while the shingle siding lends itself to a more textured, dimensional appearance. The vertical siding, often used in contemporary homes, offers a sleek, streamlined design.
Aesthetic Appeal and Suitability of Colors and Textures
Hardie board siding comes in a wide range of colors and textures, allowing for extensive customization. The colors are designed to withstand the elements and maintain their vibrancy over time. The textures, from smooth to deeply textured, can mimic the look of natural wood or stone. A smooth finish might suit a modern home, while a deeply textured finish might be better suited to a more traditional or rustic design. Darker colors absorb more heat, potentially increasing cooling costs in warmer climates, while lighter colors reflect sunlight, reducing energy consumption. Consider your local climate and personal preferences when making your color choice.
Considering Your Home’s Architectural Style
The architectural style of your home significantly influences siding selection. A Victorian home might look stunning with Hardie board shingle siding in a deep, rich color, evoking a sense of history and craftsmanship. A contemporary home, on the other hand, might be best suited to sleek, vertical siding in a neutral tone. A craftsman-style home could beautifully showcase lap siding with a slightly rougher texture. Matching the siding to your home’s architectural style creates a cohesive and visually appealing exterior.
Choosing Complementary Trim and Accessories
Hardie offers a range of trim boards and accessories designed to complement their siding. These include corner boards, window and door trim, and decorative accents. Choosing trim in a contrasting color or texture can add visual interest and highlight architectural details. For instance, using a lighter-colored trim against darker siding can create a crisp, defined look. Matching the trim material to the siding ensures a unified and polished appearance. Consider using trim details to accentuate architectural features like window casings or eaves.
Hardie Board Siding Applications on Various Home Styles
Imagine a charming Cape Cod cottage clad in classic Hardie lap siding painted a soft, muted gray. The subtle texture and color create a timeless, inviting look. Now picture a sleek, modern farmhouse accented with vertical Hardie board siding in a clean white, showcasing sharp lines and a minimalist aesthetic. Finally, visualize a rustic ranch home enhanced by Hardie shingle siding in a warm, earthy tone, blending seamlessly with its natural surroundings. These examples illustrate how different Hardie board siding profiles and colors can transform the appearance of various home styles, enhancing their unique character and appeal.
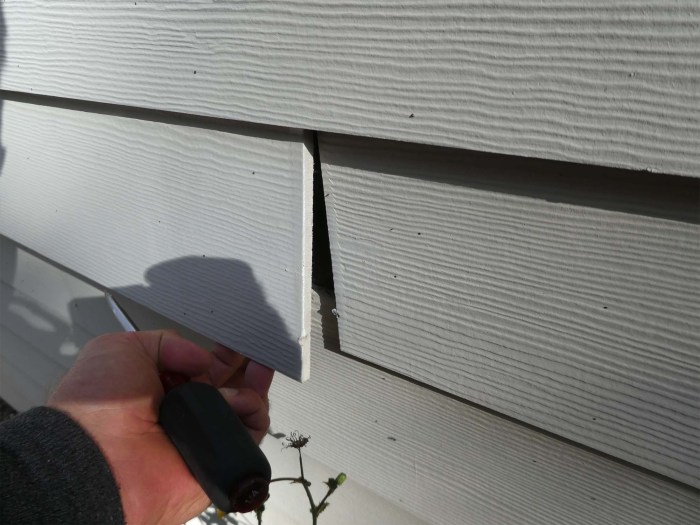
Potential Challenges and Solutions During Installation
Source: squarespace-cdn.com
Installing Hardie board siding presents several challenges, but with proper planning and technique, these can be overcome. This section Artikels common difficulties and provides practical solutions to ensure a successful installation. Remember, safety is paramount; always follow manufacturer instructions and wear appropriate personal protective equipment (PPE).
Uneven Walls and Surface Preparation
Uneven walls are a frequent hurdle. Significant variations in wall plane require careful attention to ensure the siding is installed correctly and looks good. Before installation, assess the wall’s condition. Minor imperfections can be addressed with shims and furring strips, creating a level surface for the siding. For more substantial irregularities, consider using a thicker layer of sheathing or employing a more flexible underlayment to accommodate the unevenness. Accurate measurements and meticulous planning are crucial in these scenarios to avoid gaps or misalignments. Failing to address uneven walls properly can lead to problems with the siding’s appearance and potentially its long-term performance.
Difficult-to-Reach Areas
High walls, narrow spaces, and intricate architectural details can make installation challenging. Using scaffolding or extending ladders safely is essential for access to higher areas. For hard-to-reach spots, consider using specialized tools, such as long-handled jigs or magnetic tools to hold fasteners. Pre-cutting pieces to size on the ground before installation can significantly improve efficiency and reduce the need for awkward maneuvers on ladders. Remember to always maintain three points of contact when working at heights.
Working Around Existing Features
Windows and doors require precise cuts and careful planning. Measure carefully, using templates if necessary, to ensure accurate cuts around these features. Use a sharp utility knife or jigsaw for precise cuts. Consider using trim pieces to seamlessly integrate the Hardie board with the existing window and door frames. Proper flashing and caulking are essential to prevent water penetration. Failing to correctly handle these details can lead to leaks and damage to the underlying structure.
Weather Conditions
Extreme temperatures and inclement weather can significantly impact installation. High winds can make working at heights dangerous and affect the accuracy of cuts. Rain can damage the Hardie board and make installation more difficult. Schedule the installation for favorable weather conditions. If working in hot temperatures, consider scheduling work for the cooler parts of the day and provide adequate hydration for the workers. For rainy conditions, protective coverings should be utilized until the weather improves.
Resolving Common Installation Mistakes
Common mistakes include improper nailing, gaps between boards, and incorrect flashing. Improper nailing can lead to damage or premature failure of the siding. Gaps allow water penetration, leading to rot and damage. Incorrect flashing creates pathways for water intrusion. Addressing these mistakes involves carefully inspecting the installed siding, removing and reinstalling improperly fastened sections, and correctly installing flashing to prevent water entry. A careful review of manufacturer instructions and adherence to proper techniques can prevent these issues.
Troubleshooting Tips for Common Problems
- Gaps between boards: Check for proper spacing and use shims to correct any inconsistencies.
- Cracked or damaged boards: Replace damaged sections immediately. Avoid using damaged boards.
- Improper nailing: Remove improperly nailed boards and reinstall using the correct nailing pattern and fastener type.
- Water penetration: Inspect flashing and caulking, addressing any gaps or imperfections. Ensure proper drainage away from the house.
- Uneven siding: Check for levelness throughout the installation process and use shims as needed to correct any inconsistencies.
- Difficulty cutting around windows and doors: Use templates to ensure accurate cuts and consider pre-cutting pieces on the ground.
Concluding Remarks
Upgrading your home’s siding with Hardie board is a significant undertaking, but the result – a beautiful, durable, and low-maintenance exterior – is well worth the effort. By carefully planning, budgeting, and following proper installation techniques, you can transform your home’s curb appeal and protect it from the elements for years to come. Remember to always prioritize safety and consider professional help if needed for complex aspects of the project.
FAQ Explained: Replacing Siding With Hardie Board
How long does Hardie board siding last?
With proper installation and maintenance, Hardie board siding can last 50 years or more.
Can I install Hardie board siding myself?
While possible for DIYers with experience, professional installation is often recommended, especially for large or complex projects. It ensures proper installation and avoids costly mistakes.
What’s the best time of year to replace siding?
Spring or fall are generally ideal, avoiding extreme heat or cold that can impact the installation process and the siding’s performance.
Do I need permits to replace my siding?
Check with your local building department; permits are often required for exterior renovations of this scale.
How do I clean Hardie board siding?
Regularly rinse with water; for tougher stains, use a mild detergent solution and a soft brush. Avoid harsh chemicals.
Comments are closed.