Termite Resistant Siding A Homeowners Guide
Termite resistant siding offers a crucial first line of defense against these destructive insects. Choosing the right siding material isn’t just about aesthetics; it’s about protecting your investment and ensuring the longevity of your home. This guide will walk you through the different options, installation techniques, cost considerations, and environmental impacts to help you make an informed decision.
We’ll cover everything from the various types of termite-resistant materials available, their pros and cons, and how to install them properly to minimize the risk of infestation. We’ll also explore the environmental implications of your choice and provide practical tips for keeping your home termite-free for years to come.
Types of Termite-Resistant Siding Materials
Choosing the right siding for your home is a significant investment, and protecting it from termites is crucial for longevity and structural integrity. Several materials offer inherent or enhanced resistance to termite damage, making them excellent choices for homes in termite-prone areas. Let’s explore some of the most popular options.
Termite-Resistant Siding Material Properties
Understanding the properties of different siding materials is key to selecting the best option for your needs. Factors like chemical composition, manufacturing processes, and inherent resistance all play a role in a material’s ability to withstand termite attacks. Some materials are naturally resistant, while others incorporate treatments to boost their protective qualities.
Common Termite-Resistant Siding Materials
Several materials demonstrate excellent termite resistance. These include pressure-treated lumber, fiber cement, aluminum, vinyl, and certain types of brick. Pressure-treated lumber uses preservatives like chromated copper arsenate (CCA) or alkaline copper quaternary (ACQ) to protect against insect and fungal damage. Fiber cement siding is a composite material made from cement, cellulose fibers, and other additives, offering inherent strength and resistance to pests. Aluminum and vinyl sidings, being inorganic materials, are naturally resistant to termite infestations. Brick, a traditional and durable material, also offers excellent protection against termites.
Durability and Lifespan Comparison
Let’s compare the durability and lifespan of three popular choices: pressure-treated wood, fiber cement, and vinyl siding. Pressure-treated lumber, while offering good termite resistance, has a shorter lifespan (15-30 years) compared to fiber cement (50+ years) and vinyl siding (30-50 years). Fiber cement, though more expensive initially, boasts superior durability and longevity. Vinyl siding offers a good balance between cost and lifespan, but may be less resistant to impact damage than fiber cement. Regular maintenance for all three materials extends their lifespan significantly.
Maintenance Requirements for Termite-Resistant Siding
Regular maintenance is essential to prolong the life of any siding, regardless of its termite resistance. Pressure-treated wood may require occasional repainting or staining to maintain its appearance and protect against weathering. Fiber cement siding is relatively low-maintenance, needing only occasional cleaning to remove dirt and debris. Vinyl siding is also low-maintenance, requiring only occasional washing with soap and water. However, all materials might require occasional repairs for damage from severe weather events or accidental impacts.
| Material | Cost (Approximate) | Lifespan (Years) | Maintenance |
|---|---|---|---|
| Pressure-Treated Wood | $5-$15 per square foot | 15-30 | Repainting/Staining, Minor Repairs |
| Fiber Cement | $10-$30 per square foot | 50+ | Occasional Cleaning, Minor Repairs |
| Vinyl | $4-$12 per square foot | 30-50 | Occasional Cleaning, Minor Repairs |
| Aluminum | $8-$20 per square foot | 40-60 | Occasional Cleaning |
| Brick | $15-$40 per square foot | 75+ | Minimal, occasional cleaning and mortar repair |
Installation Techniques for Termite-Resistant Siding
Source: co.in
Installing termite-resistant siding is crucial for protecting your home’s structure and preventing costly repairs down the line. Proper installation techniques, combined with the right materials, create a robust barrier against termite infestations and water damage. This section will guide you through the process using pressure-treated lumber as an example. Remember to always consult local building codes and manufacturer instructions for specific requirements.
Preparing the Wall Surface
Before installing any siding, thorough preparation of the wall surface is paramount. This prevents future problems and ensures a long-lasting, secure installation. Begin by removing any existing siding, ensuring you completely clear away any damaged wood or debris. Inspect the underlying sheathing for signs of rot, insect damage, or moisture. Replace any damaged sections with new, appropriately treated lumber. Clean the entire surface using a wire brush to remove loose paint, dirt, and any other contaminants. This ensures proper adhesion of the new siding and prevents pest entry points. Finally, treat the entire wall surface with a suitable insecticide to eliminate any existing pests.
Installing Pressure-Treated Lumber Siding
Pressure-treated lumber offers excellent termite resistance due to the chemical treatment it undergoes. Installation typically involves these steps: First, establish a level starting point using a ledger board attached to the wall framing. This ensures the siding remains plumb and straight. Next, install the first course of siding, ensuring it’s level and securely fastened to the ledger board using appropriate nails or screws. Subsequent courses are installed, overlapping the previous course by a specific amount (usually determined by the manufacturer’s instructions) to prevent water penetration and provide structural integrity. Continue this process until the entire wall is covered. Use galvanized nails or screws to avoid rust and corrosion. Remember to maintain consistent spacing between siding boards.
Sealing and Caulking Around Windows and Doors
Proper sealing and caulking are vital to prevent water infiltration, which can attract termites and lead to wood rot. Before installing siding around windows and doors, apply a high-quality, paintable caulk to seal any gaps between the framing and the siding. This creates a watertight barrier and prevents termite entry. Ensure the caulk is compatible with both the siding material and the paint that will be used. After the siding is installed, apply additional caulk to any gaps or cracks that may have appeared during installation.
Proper Overlapping Techniques
To illustrate proper overlapping, imagine each siding board as a rectangle. Each subsequent board should overlap the previous one from the bottom up, typically by a few inches (the exact amount depends on the siding and manufacturer instructions). This creates a stepped pattern, preventing water from running behind the siding and into the wall. Think of it like shingles on a roof – the overlapping creates multiple layers of protection. A visual representation would show a series of slightly offset rectangles, each slightly higher than the previous one, with the top edge of the lower rectangle hidden beneath the bottom edge of the upper rectangle. This overlap should be consistent across the entire wall to ensure uniform water runoff and protection from termites.
Cost Comparison of Termite-Resistant Siding Options
Choosing termite-resistant siding involves a significant investment, and understanding the cost variations between different materials is crucial for budgeting. This section breaks down the costs associated with various options, helping you make an informed decision. Remember that prices can fluctuate based on location, supplier, and market conditions.
Material Costs and Labor Estimates
The initial cost of termite-resistant siding is heavily influenced by the material chosen. Aluminum siding generally sits at the lower end of the price spectrum, followed by fiber cement and then higher-end options like treated wood or engineered wood products. However, this is just the material cost. Labor costs represent a significant portion of the overall expense, and these are affected by factors like the complexity of the installation (e.g., intricate detailing, multiple stories), the size of the project, and the installer’s hourly rate. For example, installing aluminum siding on a simple ranch-style home might cost less than installing fiber cement on a Victorian-style house with elaborate trim work.
Factors Influencing Overall Cost
Several factors beyond material and labor can significantly impact the final cost. Material availability, especially for specialized or less common options, can influence pricing. If a specific type of treated wood is in short supply, its price might increase. Project complexity, as mentioned earlier, plays a major role. A simple, flat-surface installation will be less expensive than a project involving numerous angles, corners, and decorative features. Location also matters; labor rates and material costs can vary widely depending on geographic location and local market conditions. For instance, a project in a densely populated urban area might be more expensive due to higher labor rates and potentially higher material transportation costs.
Calculating Total Cost for a Siding Project, Termite resistant siding
Let’s illustrate with an example. Suppose you’re siding a 1,500 square foot house with fiber cement siding. Assume the material cost is $6 per square foot, and the labor cost is $4 per square foot. The total material cost would be 1500 sq ft * $6/sq ft = $9000. The total labor cost would be 1500 sq ft * $4/sq ft = $6000. Therefore, the total estimated cost of the project would be $9000 + $6000 = $15000. This is a simplified example; a real-world estimate would need to account for additional factors like permits, waste removal, and potential unforeseen complications. It’s always advisable to get multiple quotes from reputable contractors.
Cost-Saving Strategies for Termite-Resistant Siding
Planning ahead can significantly reduce the overall cost.
- Choose less expensive, but still effective, materials: Aluminum siding, while perhaps not as aesthetically pleasing as some options, can be significantly cheaper.
- Prepare the surface thoroughly yourself: While time-consuming, preparing the existing siding for installation yourself can save on labor costs.
- Shop around for materials: Comparing prices from multiple suppliers can lead to substantial savings.
- Consider the timing of your project: Off-season installation might offer lower labor rates.
- Opt for simpler designs: Avoid overly complex designs that increase labor costs.
Environmental Impact of Termite-Resistant Siding Materials
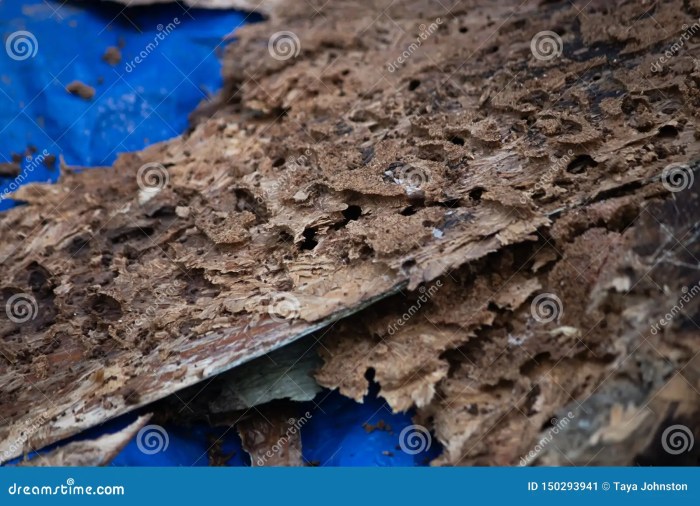
Source: dreamstime.com
Choosing siding materials involves more than just aesthetics and durability; it also has significant environmental consequences. The manufacturing process, transportation, and eventual disposal of siding all contribute to its overall carbon footprint and impact on natural resources. Understanding these impacts is crucial for making informed, environmentally responsible choices.
Manufacturing and Disposal Impacts of Various Siding Materials
The environmental impact varies greatly depending on the siding material. Pressure-treated lumber, for example, often uses chromated copper arsenate (CCA) preservatives, which are highly toxic and pose significant environmental risks. Their manufacture requires energy-intensive processes and the chemicals used can contaminate soil and water if not handled properly. Disposal of CCA-treated wood is also problematic, requiring special handling to prevent environmental contamination. Conversely, materials like fiber cement and certain types of vinyl siding have lower toxicity profiles during manufacturing but still require energy for production and their disposal can contribute to landfill waste. Aluminum siding, while recyclable, demands significant energy in its initial production.
Carbon Footprint Comparison of Siding Options
A comprehensive life-cycle assessment is needed to accurately compare the carbon footprint of different siding options. This would include evaluating the energy used in raw material extraction, manufacturing, transportation to the job site, installation, and finally, disposal or recycling. While precise figures vary based on manufacturing processes and transportation distances, generally, materials with higher recycled content and those requiring less energy-intensive production processes tend to have a smaller carbon footprint. For example, siding made from rapidly renewable resources like bamboo might have a lower carbon footprint compared to aluminum or vinyl siding, depending on the specific manufacturing and transportation details. However, even seemingly sustainable options like bamboo can have environmental drawbacks if harvested unsustainably.
Use of Recycled Materials and Their Impact on Sustainability
The use of recycled materials in siding production significantly reduces the environmental impact. For instance, some vinyl siding incorporates recycled PVC, lessening the demand for virgin materials. Similarly, some fiber cement siding uses recycled fly ash or slag from industrial processes. The higher the percentage of recycled content, the lower the overall environmental burden. The availability and cost of recycled materials can, however, influence the overall cost and feasibility of using such products. For example, the availability of recycled aluminum may impact the cost and sustainability of aluminum siding.
Sustainable Siding Option: Fiber Cement with Recycled Content
Fiber cement siding, particularly varieties incorporating recycled materials like fly ash and slag, represents a relatively sustainable option. Its durability reduces the need for frequent replacements, thus minimizing waste over its lifespan. It’s also resistant to rot, insects, and fire, reducing the need for chemical treatments. However, fiber cement manufacturing still requires energy, and the disposal of broken or damaged panels contributes to landfill waste. Furthermore, the manufacturing process can generate dust, requiring appropriate safety measures. While not entirely without environmental impact, fiber cement siding with recycled content offers a better balance between performance, durability, and environmental considerations compared to some alternatives.
Preventing Termite Infestation with Termite-Resistant Siding
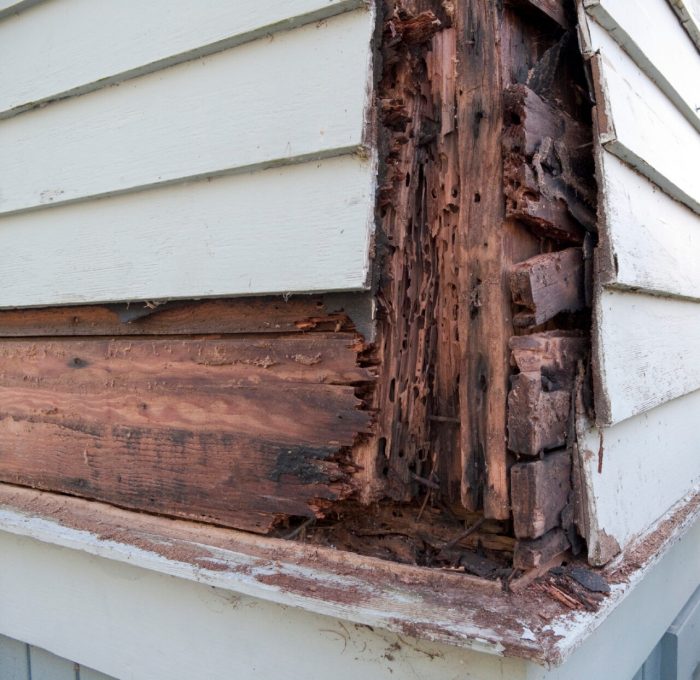
Source: franklinpestsolutions.com
Choosing termite-resistant siding is a crucial first step in protecting your home, but it’s not the only one. Several factors contribute to a truly termite-proof structure, and understanding these elements is vital for long-term protection. This section will explore how the properties of different siding materials deter termites, other preventative measures, and the importance of proper ventilation.
How Termite-Resistant Siding Materials Deter Termite Activity
Different termite-resistant siding materials offer protection through various mechanisms. For instance, treated lumber uses preservatives like copper azole, chromated copper arsenate (CCA), or borates to make the wood toxic to termites. These chemicals disrupt termite metabolism and prevent them from feeding on the wood. Aluminum and vinyl siding, on the other hand, offer a physical barrier. Termites cannot easily penetrate these materials, preventing them from accessing the underlying wood structure. Certain composite materials, such as fiber cement, are naturally resistant due to their density and lack of appealing nutrients for termites. The inherent properties of these materials, combined with proper installation, significantly reduce the risk of termite infestation.
Preventative Measures Beyond Siding
While termite-resistant siding forms a significant part of a termite defense strategy, a comprehensive approach requires additional measures. Soil treatment around the foundation is crucial. This involves applying termiticides to the soil to create a barrier that prevents termites from reaching the structure. Regular foundation inspections are also essential to identify any signs of termite activity early on. Early detection allows for prompt treatment, preventing widespread damage. Finally, removing any wood-to-soil contact minimizes potential entry points for termites. This includes ensuring proper grading around the foundation to prevent water accumulation, which attracts termites.
The Role of Proper Ventilation in Termite Prevention
Proper ventilation plays a critical role in preventing moisture buildup, a major attractant for termites. Moisture creates a favorable environment for termite colonies to thrive. Adequate ventilation in crawl spaces and attics helps to regulate humidity levels, reducing the likelihood of termite infestation. This can be achieved through the use of vents, fans, and proper insulation. Maintaining good airflow around the house also prevents the accumulation of moisture in the siding itself, which could otherwise compromise its integrity and attract termites.
Steps to Ensure Long-Term Protection Against Termites
A successful termite prevention strategy requires a multi-faceted approach. The following flowchart illustrates the key steps involved:
Flowchart: Ensuring Long-Term Protection Against Termites
Start → Select Termite-Resistant Siding (e.g., treated lumber, aluminum, vinyl, fiber cement) → Proper Installation of Siding (ensuring no gaps or openings) → Soil Treatment Around Foundation (applying termiticides) → Regular Foundation Inspections (at least annually) → Maintain Proper Ventilation (crawl spaces, attics) → Eliminate Wood-to-Soil Contact (proper grading) → Ongoing Monitoring (for signs of termite activity) → End
Outcome Summary
Source: summitroofers.com
Protecting your home from termites requires a multifaceted approach, and choosing termite-resistant siding is a significant step. By understanding the different materials, their installation, and long-term maintenance, you can significantly reduce the risk of damage and increase the lifespan of your home. Remember, prevention is key, and combining resistant siding with regular inspections and preventative measures will give you peace of mind for years to come. Make an informed choice and safeguard your investment!
Answers to Common Questions: Termite Resistant Siding
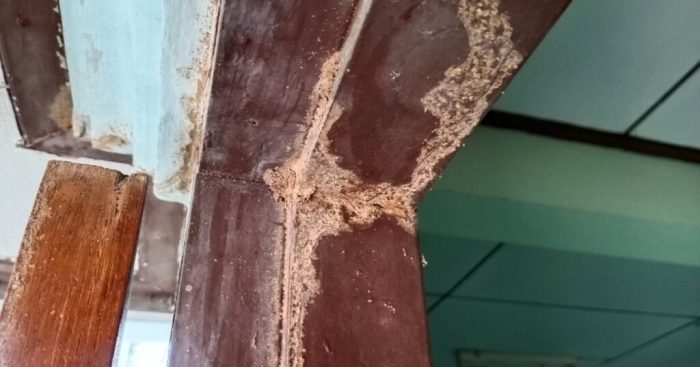
What are the common signs of termite damage?
Look for mud tubes (tunnels), wood that sounds hollow when tapped, sagging floors or ceilings, and discarded wings near windows or doors.
How often should I inspect my siding for termite damage?
At least twice a year, especially during spring and fall, when termites are most active.
Can I install termite-resistant siding myself?
While possible for some types, professional installation is often recommended for optimal results and warranty coverage.
What is the warranty on termite-resistant siding?
Warranties vary greatly depending on the manufacturer and material. Check the specifics before purchasing.
Are there any government incentives for using eco-friendly siding?
Some regions offer tax credits or rebates for energy-efficient home improvements; check with your local government.
Comments are closed.